
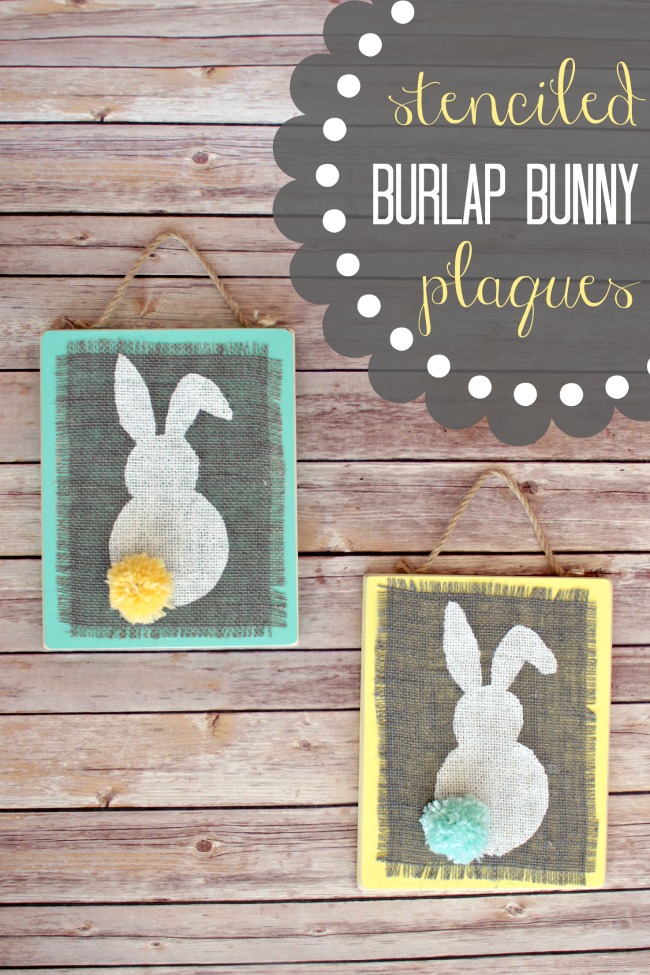
Easter Craft Stenciled Burlap Bunny Plaques
I love creating holiday-themed items like this fun Easter craft! It’s so much fun to bring special little touches to your home around all of the holidays, and a craft like this one is a great choice!
It’s Katie again from View From The Fridge. I’m so glad to be back here at Oh My! Creative this month. Today, I thought I’d share an easy Easter craft project … Stenciled Burlap Bunny Plaques.
*This post contains affiliate links. Read my full disclosure*
Easter Craft Stenciled Burlap Bunny Plaques
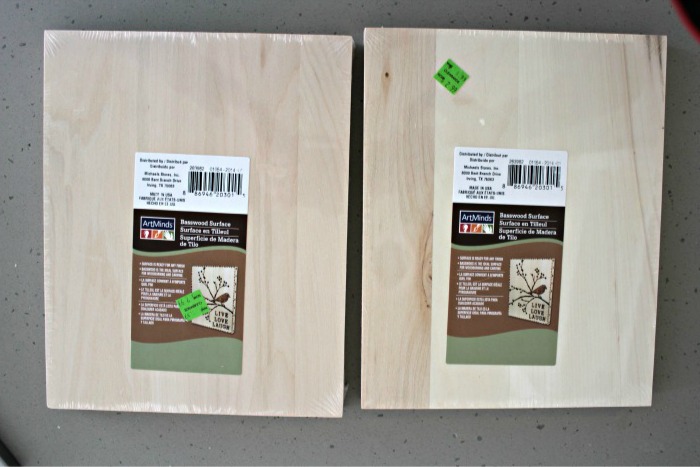
This whole idea started when I found these wood plaques on clearance at Michael’s:
If you’ve seen my project, then you may notice a couple of things I love and seem to gravitate towards:
- Burlap anything …
- Stenciling (probably because my free-handing skills are lacking … at best).
- Shabby Chic Decor
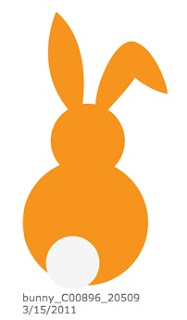
With these things in mind for this project, my idea for a great Easter craft was born … stenciled burlap plaques! Now, I needed a stencil (and, as of now, I still don’t own a Silhouette or Cricut). I did, however, find this fun bunny silhouette shape online that is CUTE and simple enough to create a handmade stencil out of:
Supplies:
- The bunny shape above printed and cut out
- 8″ x 10″ piece of wood
- Adhesive vinyl sheet
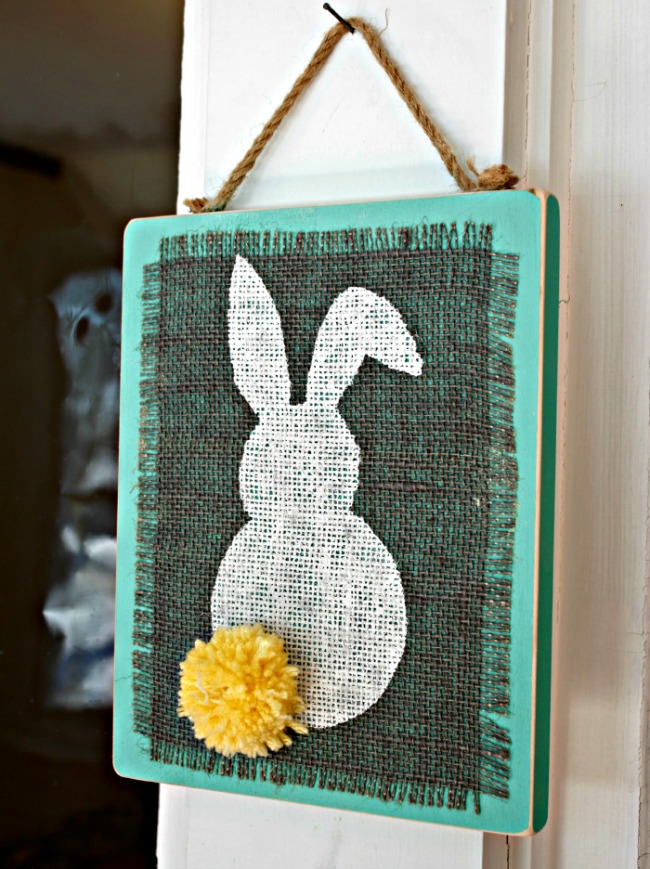
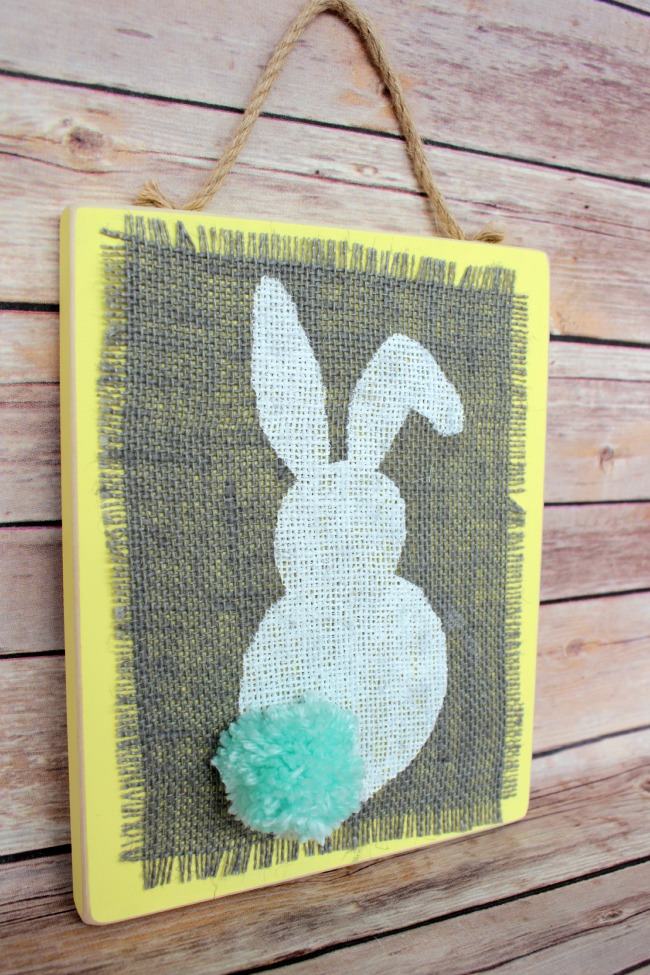
- 7″x 9″ piece of burlap with ends frayed (to easily fray your burlap, after cutting simply start pulling out individual threads from each side)
- Craft paint: plaque colors (I used yellow and light turquoise) and bunny color (white, in my case)
- Pouncer (sponge brush for stenciling)
- Rope or ribbon for hanging the plaque
- Yarn
- Spray Adhesive
- Sandpaper
- Staple gun
Step-by-Step:
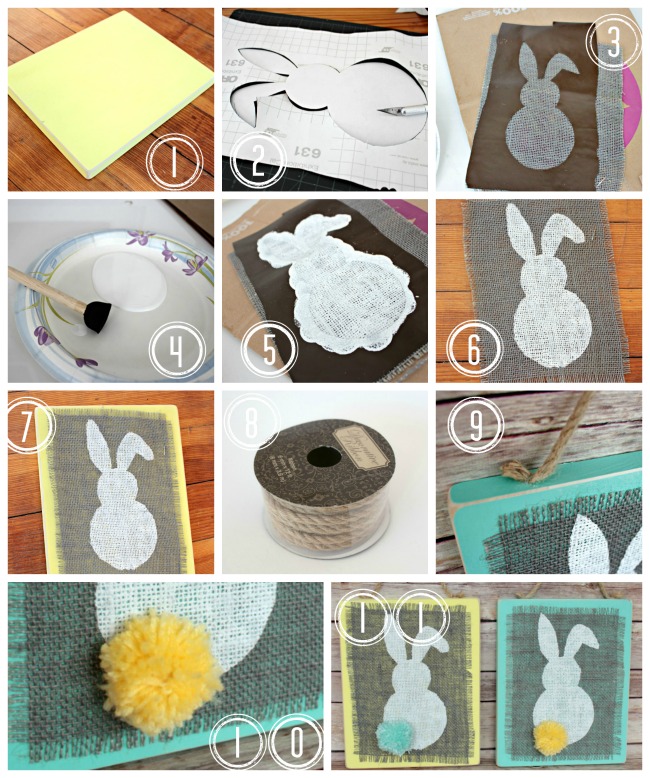
- MAKE PLAQUE: Paint your plaques with craft paint, let dry, then sand edges and corners for a distressed look.
- MAKE STENCIL: Trace the bunny shape onto the back of adhesive vinyl, then carefully cut out using a craft knife.
- STENCIL: Stick vinyl onto the center of burlap piece.
- Using a pouncer and white craft paint,
- Apply paint to the inside of bunny (using a ‘pounding’ motion to apply paint rather than brushing motion)
- Allow paint to dry for 10-15 minutes, then remove stencil.
- Once the paint is fully dry (at least another hour or so), spray back of stenciled burlap with a generous coat of adhesive and place burlap in the center of plaque (adhesive sticks quickly, so make sure burlap is centered from the beginning).
- I used a piece of rope to hang plaque (you could also use ribbon, twine, yarn, etc).
- Using a staple gun, staple the piece of rope to the top of plaque (one staple on each side).
- Make yarn pom tail and glue in place on the plaque.
- Finished!
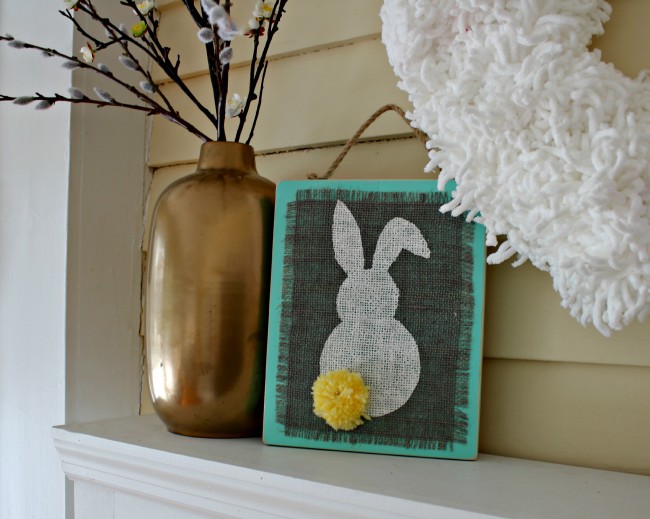
You can hang these plaques together for a fun Easter craft on a hallway, front door, kitchen wall, or even living area!

Hang them separately:
Or simply set on your mantel:
One of the best parts about this Easter craft, you probably have most of these supplies lying around already! You can definitely use a scrap piece of wood for the plaque (instead of buying them from Michael’s as I did). Don’t have any adhesive vinyl laying around? You could also make a stencil out of cardstock. Just make sure to secure it to your burlap with some tape, and focus on ‘pounding’ on the paint (up and down motion) to achieve nice crisp lines.
I hope all of you are enjoying your Spring so far! Have a wonderful Easter!
See more creative Easter Ideas here!
You might also like…
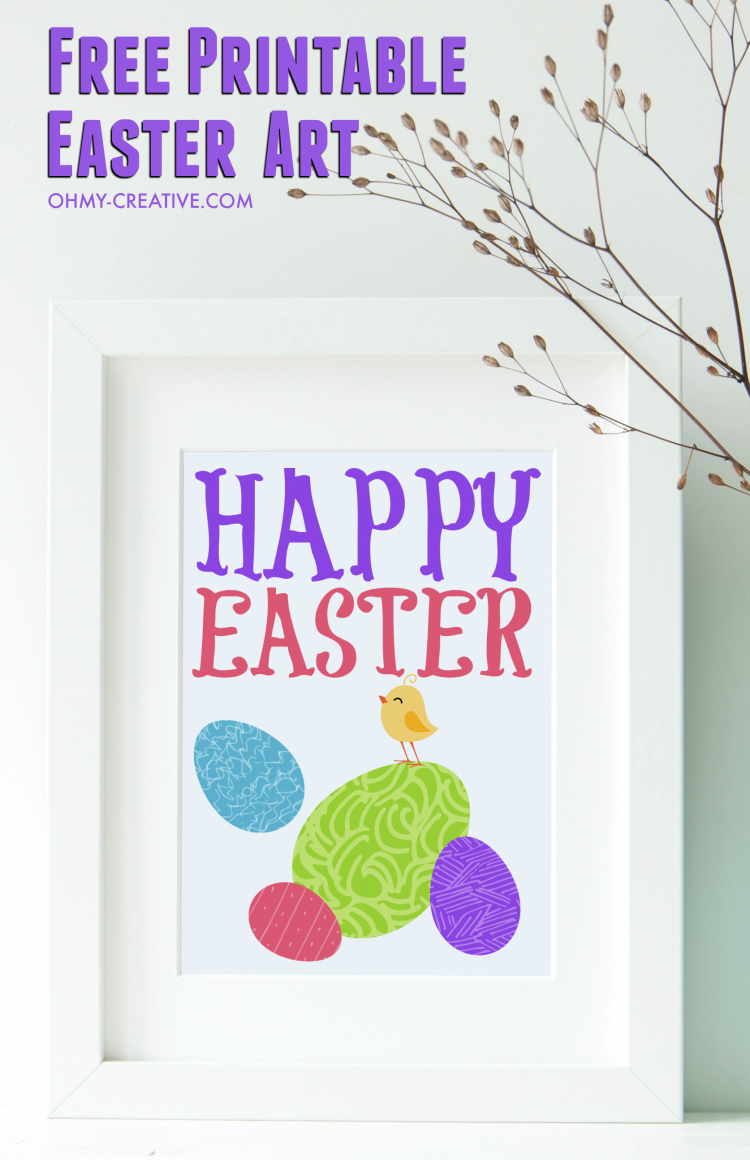
EASTER FREE PRINTABLE ART
EASTER CHICKS CUPCAKES
CARROT VEGETABLE PIZZA
HAPPY EASTER FREE PRINTABLE ART
SUNFLOWER PEEPS BROWNIES
CADBURY MINI EGG COOKIE DOUGH DIP
PRETTY EASTER TREATS
PEEPS PUDDING POPS
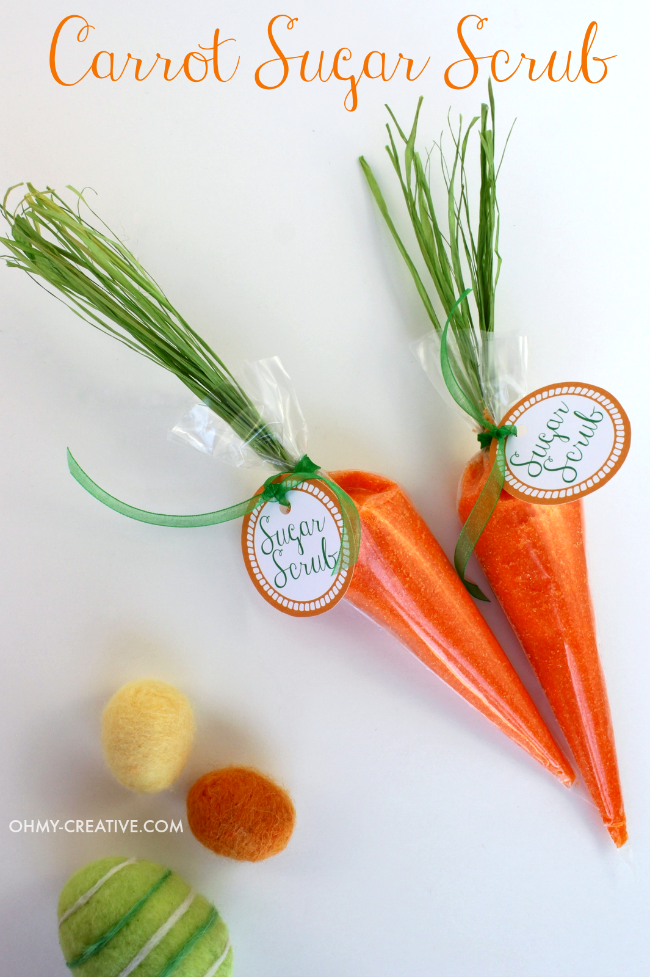
35 CARROT EASTER CRAFTS AND DESSERTS

Susan B
Latest posts by Susan B (see all)
- Free Printable 4th of July Word Search - July 2, 2026
- 4th of July Barbeque Ideas - June 28, 2026
- Best Luau Birthday Party - June 17, 2026


Very cute!
I do have ALL these supplies in my house for a project like this! I’ve gotten several of these fancy shaped wooden plaques from JoAnns that I need to do something with. What a great idea, totally love’em!
What a cute project for Easter! The tales are too precious! Kari
I just finished making 3 of these! I am so proud of myself! 🙂 Had a little trouble with getting crisp lines from my stencil, but with a little touch up they still look adorable. Used yellow, turquoise, and lime green for my wood colors and found a multi-colored yarn that has the same colors to use for the tails. Giving them as gifts to my mom & grandmother, and one for me! Thanks for sharing this craft & making the directions easy to follow! If I can do it, then anyone can!
Fantastic Stephanie! I’m so glad you liked the plaques enough to make your own! I hope your mom and grandmother LOVE their gifts! Happy Spring!
Hello! Stopping by from Whimsy Wednesdays and sharing some social media love! This is my second time at your site and I love it even better this time! What will happen the next time I visit? 🙂 This DIY tutorial is darling and I a so glad I found you guys!
These burlap bunnies are so cute and most of the supplies I have on hand already, which is a bonus. The colors you chose are so sweet and perfect for Easter decorations. I just love your projects!
I just love it! Burlap anything is my new favorite, too! I suppose my only problem with this one is that I wouldn’t want to take it down after Easter time, lol!
Great job, adorable! thanks for sharing on craft schooling Sunday!
These are adorable Susan! Thanks so much for sharing at Oh My Heartsie Girls Wordless Wednesday!
These are adorable, and would be so easy to make. I love the little pom pom tail. Pinning!
This is one of the cutest bunnies I’ve seen! I just LOVE it! Thanks for linking it up to my party this weekend…It’s absolutely adorable!
This is such a cute project 🙂 Thank you so much for sharing!
Joanita @ Snickerdoodle Sunday
This is so adorable! I have so many of the supplies on hand! Got to get cracking before Easter comes. Thanks for the inspiration!
Looks like a perfect hostess gift or teacher pressy. Cheers!
I just love this gorgeous little craft! I’m featuring you at this week’s The Creative Corner Link Up! It goes live tonight (Sunday 6pm PST). Pop over to see your feature. I’ll be popping you into a great roundup of beautiful Easter Projects from last week’s linky party! Can’t wait to see what else you link up this week! 🙂 xx
Cute idea and it looks so doable! Thanks for bringing this by to Throwback Thursday! 🙂
Mollie
Cutest project ever! Thanks for sharing at #HomeMattersParty
You are so talented! I absolutely love these. Great idea. Thanks for linking up at #SaucySaturdays.
Simple, but it’s sooo cute.