How To Build A Pond Waterfall Step By Step
I am so happy to finally share how to build a pond waterfall step by step! See how I created my backyard water feature for a fraction of the price of hiring a landscaper. I saved thousands of dollars and couldn’t be happier with how it turned out!
how to build a pond waterfall step by step
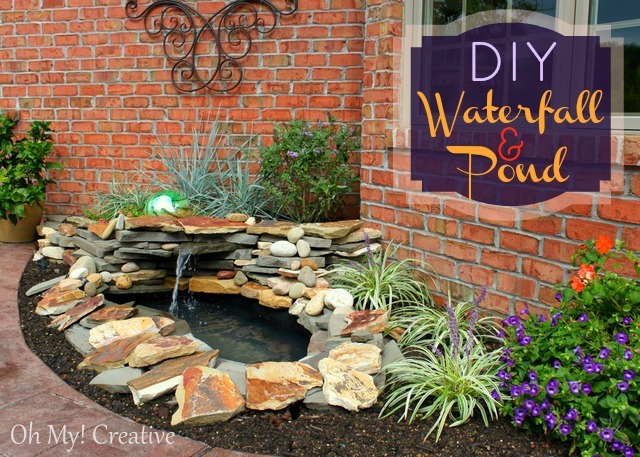
This is a project I have wanted to do for several years and this past summer, I decided it was going to get done. Most of my delay over the years in completing this project was the cost.
As I suspected, when I got a few estimates, they ranged from $4,000 to $5,000. Of course, this stopped me in my tracks…to say the least, I was highly disappointed. My husband was pushing me towards a pre-fab fountain…not my vision!
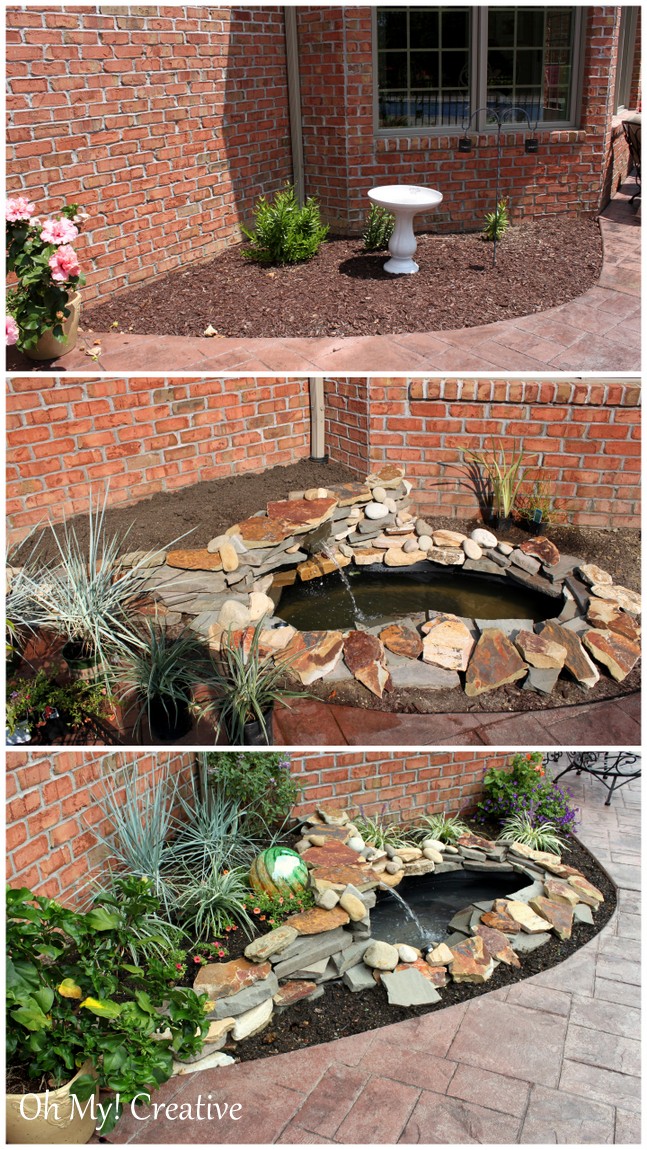
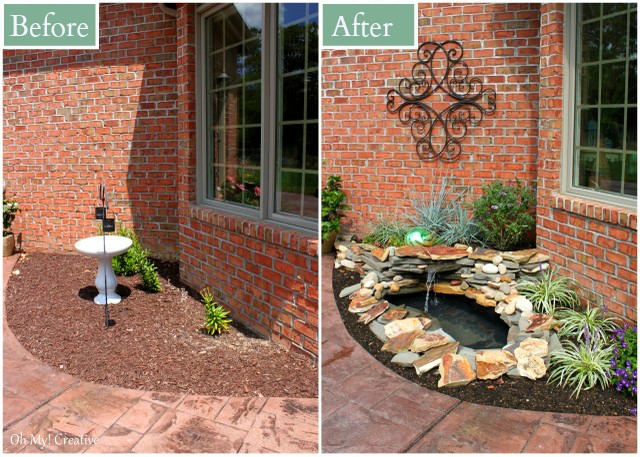
You can see, in the before photo, the small area that needed attention was surrounded by a walkway and patio. Each summer I would plant annuals and place a bench there to make it look nice, but never did any permanent landscaping to the bed…because I had a vision!

This post contains affiliate links. Read my full disclosure.
I was determined to not give up on “my vision” of a water feature, so I began to do a little research online to see how to build my own. I felt a little unsure about being able to complete this project on my own until I found a book in my basement…yes, I already owned it…who knew!
Paging through the book I found a perfect example of how to build this simple pond with a waterfall. It included all the step by step photos and supplies that I would need. The book is from Sunset – Garden Pools, Fountains & Waterfalls. It made me feel more confident to have a visual source to help me get through the project.
Unsure of what I needed I bought extras of many things so that when I was in the construction process, I wouldn’t have to run out and buy something different. I returned all unopened items.
Pond Supplies
50 Gallon Pond Basin | 3/4″ Vinyl Tubing | Water Garden Pump
OTHER ITEMS YOU MIGHT CONSIDER:
Flat Box Filter | Underwater Pond Lighting | Pond Liner
Marking Paint | Shovel | Level | Solar Lights
Outdoor Outlet Wireless Remote Control Converter Kit
How To Build A Pond Waterfall Step By Step
Since my space was small, I bought the 50-gallon plastic form. Now I know a professional would not have used a plastic form but would have created a custom plastic-lined pond. I was afraid of that leaking over time and went for the form.
Along with the pond, I wanted to create a small waterfall with a stone wall. The brick wall, on this side of the house, bakes in the afternoon sun. I have tried to plant tall flowering annuals there and they just can’t take the afternoon sun. So, I decided to create a small stone wall to add a little elevation and add a few plants and grasses there that can take the heat. Using the wall, I incorporated the waterfall.
Getting started…
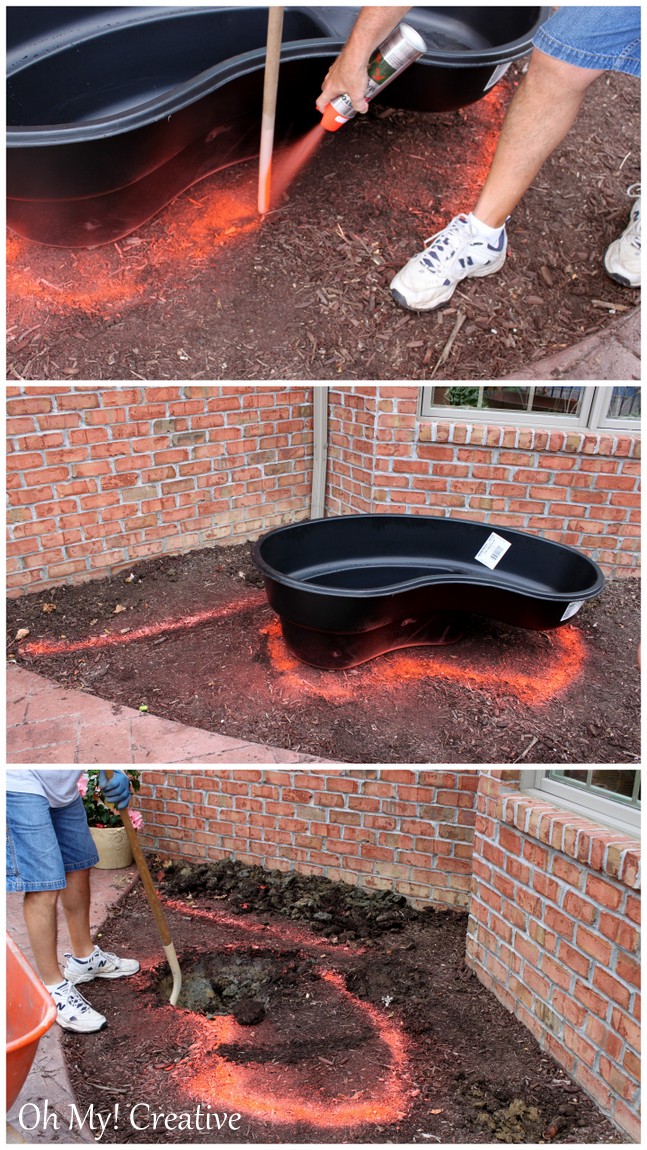
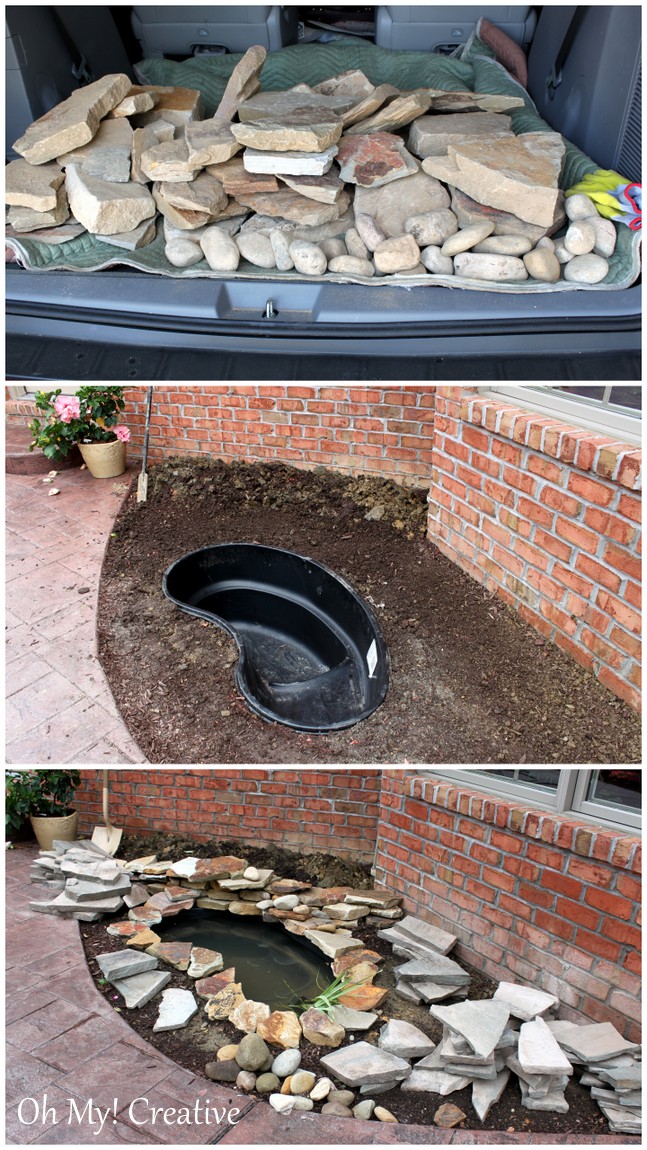
We marked the shape of the pond and a rough area for the wall with spray paint. Then began to dig.
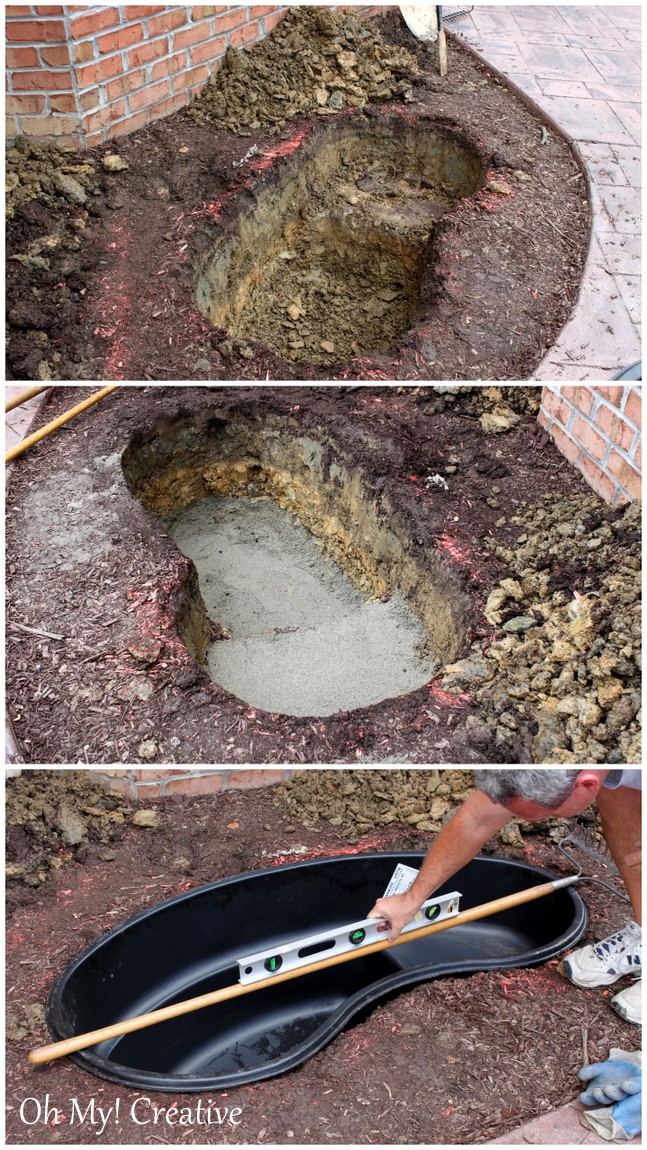
Once the hole was dug, we tested it to make sure it was fitting properly. We did this several times. Once we were happy with the fit, we placed sand in the bottom to help level it and to fill any of the gaps between the soil and the form. We also made sure the pond was completely level.
Getting the stone was interesting. The landscape supplier had beautiful pallets of stone but was much more stone than I needed. They were willing to let us climb their remnant stone pile and pick what we wanted.
So on a 95-degree day, my daughter and I loaded up the minivan and for $26 this is how much stone we picked out! Did I mention it was 95 degrees…we were dying.
Once we got it home, we had to unload it and haul it all to the back of the house. It was a bit unbearable! After placing the stone, I realized I needed at least double the amount I brought home. Instead of climbing for more stones, I found a water garden shop that sold small pallets. Once again, I filled my minivan with the stone and brought it home!
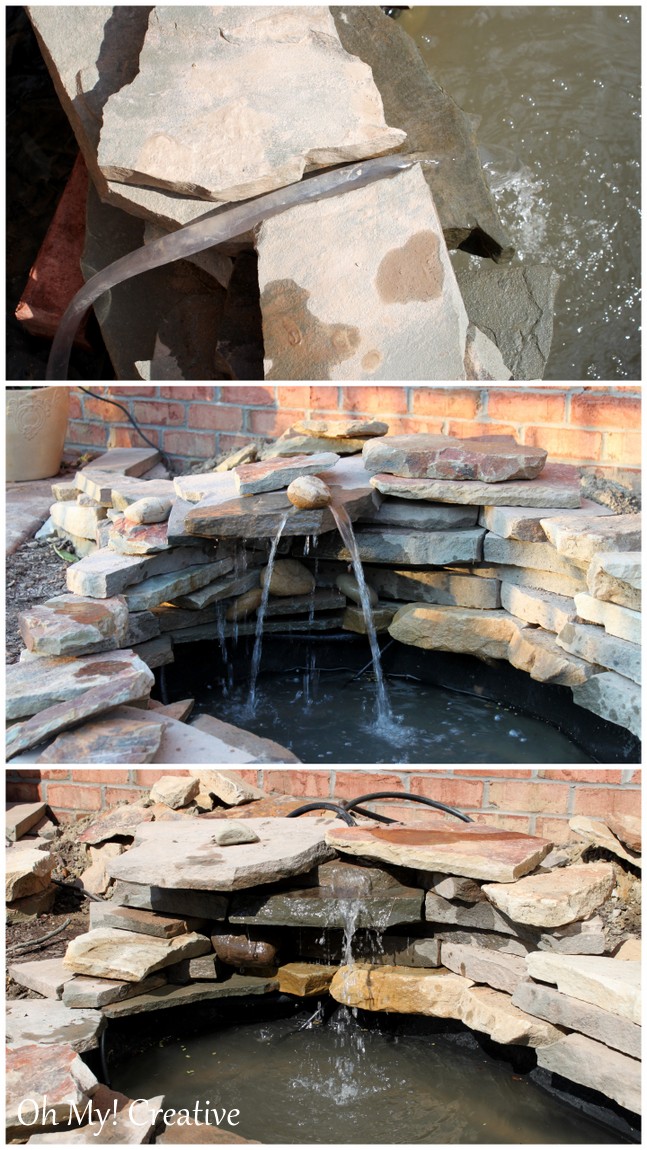
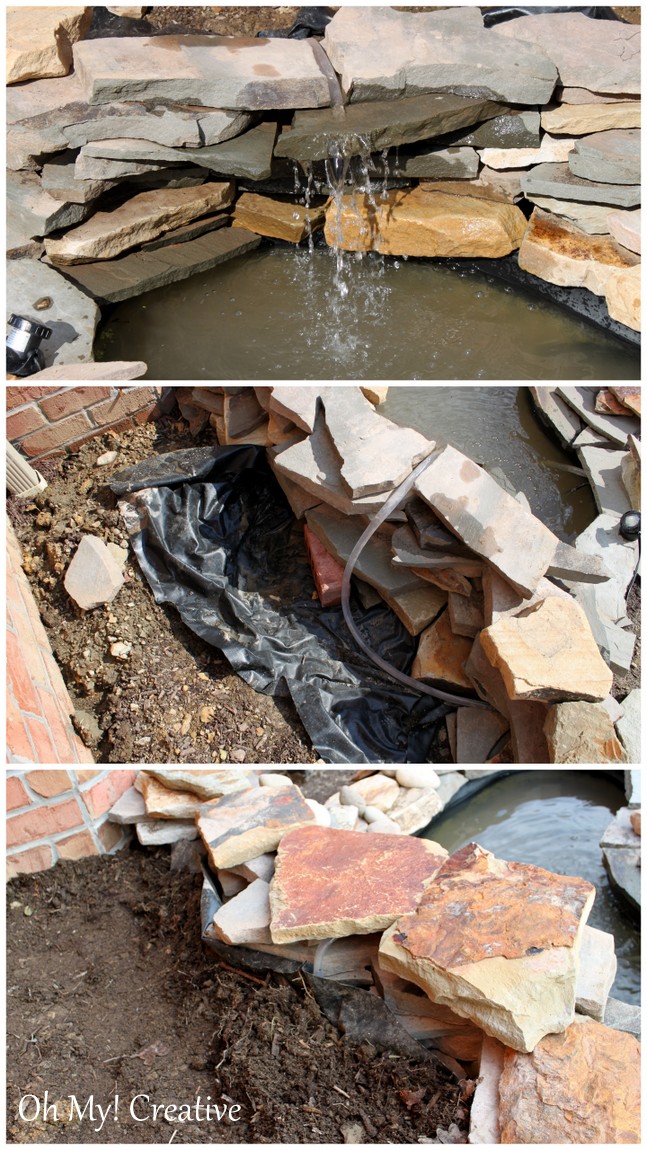
Truth is, I built the mini wall three times with much frustration. I had to place the pump and tubing first before I could build the wall as the tubing had to come up behind the wall.
The problem I ran into was that when the water spouted out and down the stone it also drained behind the wall. I didn’t want to be pumping the water for the waterfall and having it draining into the soil behind…this drove me a little crazy!
By moving the tubing around and using other small stones to divert the flow of the water away from the wall, I got it down to a minimum. As a precaution, I placed a piece of pond plastic from the edge of the tub and brought it up the back of the stone, so the water could not drain. Then I backfilled it with soil.
The final step was to visit a few garden centers for the right type of plants. As I said, this area gets full sun during the day. I went with a few types of grasses…some flowering and a butterfly bush.
I was so pleased with the end result and proud of myself for completing my own backyard pond! See below for my cost breakdown. The iron wall decor is from Kirkland’s.
Stone $117.00
Pond Supplies $190.00
Plants $134.50
Total $441.50
Now that’s a savings!
UPDATE: Several people have asked about the electrical source.
There is an outlet behind the pot in the left of this photo. I plugged in the pump there and hid the cords with the potted flowers. Last summer (2014) I had an electrician add an outlet near the window in the corner. He accessed the power from the unfinished part of our basement below.
Now I can plug the pump in without seeing the wires as the landscaping covers up the outlet. I also add a few sidewalk lights for when it gets dark.
More Garden Ideas:
How To Grow Basil And Use It In Recipes
Small Space Gardening – Grow Cucumbers On A Trellis
How To Build A Pond Waterfall Step By Step
Small Space Gardening Using A Garden Spiral




I’m totally amazed at your creative talent AND your sheer determination to get your vision just the way you wanted it! The result is beautiful. Enjoy!!!
Oh…thank you so much! It was fun to build and felt good to accomplish a project this large!
Wow! This looks great! I bought me a pond the same size at Lowe’s but I was wondering what size of pump did you get for this and what else did you need for the inside pond?
First, I used a book to help guide me, but found I was still unsure about what I needed. I bought the pump that matched the gallon size of the pond. If it gives you an option on tubing size buy the larger…more water flow. I bought a lot of extra things not knowing what I needed. A light kit (I put this in), filter (did not us because I don’t have fish) etc. It was trial and error for me. Some of these things sell out quickly so I would buy a bunch of things you think you might want and return what you don’t need. Glance at a few of the books in the store as well to see their recommendations. I had an electrical outlet right next to my area…you will need electricity! Good luck – it was a great feeling to complete this myself!
Its perfect. I have searched and searched for ideas. I hope you don’t mind if I copy. I wish I could send a picture of the area where I plan my water feature. I have Lavender mums growing in front that I have to move. I’m not sure where to put them.
Good luck with your pond Nora! Just go for it…I did and it turned out beautifully!
I love reading everything about this creative project. You have encourage me to get start on my back yard.
Oh I am so jealous I love you water pond and I want one so bad! Pinning!!
Just dropping in from Live Laugh Rowe to meet you and follow you:)
I would also love to invite you to join Let’s Get Social Sunday and link up your blog and all your social sites at one great place to meet some lovely new friends and gain more followers!! (150 bloggers every week:)
http://www.myturnforus.com/2013/02/lets-get-social-sunday-8.html
Hope to see you there and have a totally awesome day!!
Thanks for pinning. Using the book made it somewhat easy to accomplish!
It looks amazing! I am sure you are really enjoying this! Great job!
Thank you for stopping by my blog!
Absolutely beautiful! Beyond impressive. Wanna come build me one? Kidding…with your tips, I really think I could do it! Wonderful work…be proud of yourself!
Thank you! The book helped me feel confident in tackling the project…and then I just winged it 🙂
Gorgeous! My husband has built water features at every house we’ve owned. They add so much character for a little amount of money..
Barb
http://www.secondchancetodream.com
this looks amazing! the boyfriend has been trying to tell me we need one-i will have to make sure he doesn’t see this, b/c he’d definitely want one. great job!
That is awesome! What a great savings! I hope that once we have our own place (not renting) that we will be able to have a water feature too. There is something so soothing about them. Great job!
This is so beautiful! I found you through The Inspiration Board at Carolyn’s Homework and would like to invite you to link up to my party, Project Inspire{d} ~ I hope to see you there!
http://cupcakesandcrinoline.com/2013/02/project-inspired-week-2/
Mary Beth
This turned out so beautifully!! LOVE it!! 🙂
Such an ambitious project, and it turned out so well! Great job!
Love this!!! It turned out just beautiful!
Fantastic job! Now I need you to come and help me figure out what to do with my awkward random patch of dirt under one of my windows. 🙂
I’d love if you shared this recipe at my Show & Tell party this week. http://www.gingerlymade.com/2013/02/show-tell-14.html
One please 🙂
Great job – don’t you love it? We built one several years ago and are thinking about expanding it into a double fall. It is our favorite place in the yard. Hope you can stop by the enchanted oven to say hi.
xo,
Lisa
Wow! Looks fabulous!! Great job!
I am definitely saving this to feature! Love it!
Looks so peaceful! What a great deal, you saved a ton of money. Please link up to my blog and share. https://www.ohmy-creative.com/home/garden/diy-backyard-pond-landscape-water-feature/
WOW I’m SO impressed! what a great job! and price!
Thanks for much for linking up this week! I featured your post in my wrap up http://tidymom.net/2013/great-diy-projects/
Have a great weekend!
Thanks Cheryl…so appreciate the feature!
Beautiful job! Thanks for the inspiration!
Thank you Louise – great way to add a little tranquility to the backyard!
If only I had a yard, I would have one! This tiny waterfall looks relaxing.
That turned out so lovely. Nice touch with the gazing globe and the lovely plantings. The sound of water is so soothing. What a great job you did!
This is gorgeous! You did a fabulous job. Thanks so much for linking up to the Pinworthy Projects Party this week!
LOVE it! I am so showing this to my husband! Thanks for sharing at Pinworthy Projects.
Thanks Carrie! It is a doable project!
LOVE this! I just pinned it! I am hoping to add a water feature to my backyard this year. Life to the full, Melissa
Thank you so much! I love my pond and completing it makes me want to create a small pot type fountain next!
Great job! It looks wonderful!!
We have a couple ponds and there is nothing like the sound of water on a warm summer’s eve. And the grandkids have so much fun feeding the fish!
Debbie 🙂
I’ve pinned this, shared on Google+, tweeted and clipped it on Hometalk…forgot to tell you. 🙂
Thanks, Debbie for sharing in so many places!! Welcome to the link party as well!
What a fabulous feature for your home! It was a lot of work, but the impact pays off in the end. Thanks so much for sharing this past week at Project Inspire{d}!
Awesome! Pinned!
This is GORGEOUS!! What a project!
Thank you for sharing at the party 🙂
Hey Susan:
I love love love this project. I want to feature it in an article I am working on. I sent you an email yesterday. Can you shoot me a response?
Thanks so much!
Deirdre
This looks so nice! Peaceful..and done yourself how rewarding. My husband and I did something similar several years ago..and we love it! Great job
Thanks, Frances, for stopping by my blog in June! I love my pond too…it is a nice addition to our patio area!
My husband and I are getting ready to move and I mentioned that I would love a small water feature at the new house. Well, after seeing what you have done, thinking this old DIYer just might tackle this on her own! Maybe even put my herb garden around it! Thanks for this most wonderful post – really has me excited (and quite envious since yours is so beautiful!). 🙂
Great Kayce! I am so thrilled my backyard pond inspired you to create your own. I found the book very helpful in constructing it as well as have a clear vision of what I wanted ahead of time. I also bought a lot of extra supplies so I had options as I was assembling the pump etc. Good Luck!
What a beautiful water feature for your yard. I bet it’s relaxing to sit by and listen to.
Wow! Looks fabulous!! Great job!
I see there is no mention of electricity or the pump. Lack of electricity on the outside wall of my home is the only thing keeping me from doing a similar project. Yours is beautiful!
You didn’t mention anything about the pump or electricity?
You are right Jackie! I bought standard pump appropriate for a 50 gallon pond…nothing special. I was fortunate to have an electrical outlet a foot away from my pond. I camouflage it with a planter, but I am thinking of having it hardwired by an electrician so I don’t have to plug it in anymore.
love your pond, but where do you plug your pump in? did you have to get an outdoor outlet installed?
nevermind just read the other post
I love this! Can you come build one for me?
That looks amazing, I will have to save this for future reference, as we want to do something similar. Thanks for linking up to “Stumble Into The Weekend”
Their music is definitely different but i love it so much here. You cannot go wrong with it at all here. I recommend to all my friends to listen to their music. Also please try to upload some of your latest tracks. Thanks.
This is FABULOUS – I can’t wait to do this in our backyard. Thank you Susan!!
I trying to make one in my front yard but not sure what kind of pump I need
Love your pond. They can get expensive. We build one a couple years ago and have since expanded it.
Thank you, Joy! Yes, building a pond can be pricy. I love the satisfaction of building it myself! While it isn’t perfect, I am very proud of the finished look!
ty for showing how to do a water fall pond. my front yard has three water fountains that are light up at nite i hide my elc cord by putting it in pcv pipe and put 6in under ground now im wanting to do a waterfall pond next to my front window would love to send pic of it when done . yours is so cool looking.thanks again for this
Thanks you, Michael! Good luck with your pond. I have enjoyed mine all summer…it is still working beautifully!
Ditto all the above compliments, I cannot ignore my urge to make a pond. Really hate the thought of excavating (digging). Why must the water container be sunk and why must it be level? Thanks in advance.
you can build above ground but you will have to def. use alot of rocks . and liner over form w/more rocks on top. pay a cple. young teenagers to dig for you. it will be easier.
you need it level so the water doesnt spill out if one end is lower. understand? do it right or you def. will have problems.
hope this helped
You gave awesome look to your backyard. I am really inspired. Building a small pond and taking its care is a good hobby. To prevent pond leakage, Pond pro liner is the best solution. Find out Why Pond’s Pro is best.
Landscaping really makes the house look good and more alive.
it was very inspiring for me, thank you
hi,
looks amazing! nicely done!
how did you get the electrical to this site?
thanks!
i was wondering the same thing.
There is an outlet behind the pot in the left of the photos. I plugged in the pump there and hid the cords with the potted flowers. Last summer I had an electrician add an outlet to the right side of this photo near the window. He accessed the power from the unfinished part of our basement below. Now I can plug the pump in without seeing the wires as the landscaping covers up the outlet. I also add a few sidewalk lights for when it gets dark. Hope this helps!
What did you do to the pump to get the water just going to the waterfall? I have a pond about that size with a fountain but I want more water to the waterfall but am not sure how to do it. You don’t have a fountain so did you have to plug some part of the pump to direct all the water to the waterfall? Thanks for your help, Jean
Hi susan, having hard time commenting; pond is absolutely beautiful; you did a great job. i rcommend putting liner over form as i had to. my form had a leak(holes somewhere) the pump that came w/mine was not strong enough. i had to get larger one to have a nice circulation. would like to ask about your sign. did you do that? if so how did you do lettering. trying to learn how to transfer from sites. if i can, i will send you pict. of my pond. we built a pergola over it to shade fish which i got this yr.
keep up good work, like you, being a woman , i am proud of my pond too.
phyllis
It looks awesome!!!
This is perfect for my yard!!!!!! Thank you for the idea!!!!! I have one question. And once I’m sure of the answer I know I will sound stupid but, did you hook it up to a water source? Or did you fill the pond and the pump just keeps recycling it? Thanks for the info! This is getting added to my summer to do list.
Hi, Jenifer!
Just fill the pond and the filter recycles it. If the weather is hot you may need to occasionally add extra water as it evaporates. Good luck with your project!
The water feature is beautiful. I am making one in my front yard. Which flagstone did you use – the colors are exactly what I want. Also, how much would I need to make the same size water feature?
I am sorry but I have no idea what kind of flagstone I used. I just looked for a nice mixture of stones with complimentary colors that worked together.
You could do the same by looking at two different stones that work well together. Ask for help at the garden center you are buying the stone from. They should be able to help you.
Hope that helps!
You have done a superb job in creativity and saving money! Outstanding!!
I have a lined large pond with a creek that Chipmunks have eaten through the lining. I can’t afford to pay to have it redone Professionally and do not want to given that Chipmunks still exist.
So I really appreciate your website and information. It has me planning already on a different approach that will last that we can do ourselves.
I love your water feature! We did one at our last house. I have been debating for almost 9 years about doing one here. I think I’m going to try it this fall when it gets cooler. I live in NC on the coast and it is just too hot in the summer. Once hurricane season passes, I’ll give it a shot. Thanks for the inspiration and courage.
I LOVE this! I have a similar sized pond and this is exactly what I have in mind. I’m going to start it tomorrow 🙂
Thanks for the play by play……
I hope it goes well for you. It was so gratifying to build my own pond.
Hello, I was wondering is that cement that you added before placing the pond down? Did you also have a liner?
I’m sorry I didn’t reply sooner. That is sand added and smoothed out under the liner. We just used the preformed plastic liner without any additional lining. We have not had any leaks for many years even through the winter months.
Thanks for sharing this! Really useful! I’m about to have water feature contractors near me, https://purelyponds.com/pond-contractor-near-me/ build the koi pond for us and I really think that this DIY will give me awesome perspective on it! Thanks again!
Hi Susan
That’s a beautiful DIY project I must say! Sorry it has been a while that you have built this.
I stumbled upon it as I plan to make one in my backyard as well and found this to be the easiest and doable.
One question though: Did you use a pond liner? Because in one of the pics where you mention the placement of the pipe, I saw the liner beneath the stones.
Could you please clarify? TIA 🙂
Hi, Yes, I used a 50 gallon formed pond liner. It seemed like the simplest thing to do at the time and has worked out great. We still enjoy the pond today!
Such an organic stuff shared!!! There is an space in my backyard, will try this one, thanks for sharing this.
I’ve always wanted to have some addditional feature in our garden. I think this pond is a perfect choice
Thanks for sharing this How To Build A Pond Waterfall Step By Step, seems so interesting and will love to make this one.
Thanks for sharing about How To Build A Pond Waterfall Step By Step, love this nature craft. Amazing one , will love to try this unique recipe. Definitely gonna try this craft this weekend.
Good post guys!
Hi Susan, I found your post on Pinterest, as I’m desperately looking for ways to spruce up our backyard landscape without breaking the bank! I really appreciate your careful explanation and especially the pictures! Good job! Now, to find supplies and make something similar in our little yard… 🙂
Thanks for sharing about how to build a pond waterfall step by step, I was actually looking for same.