
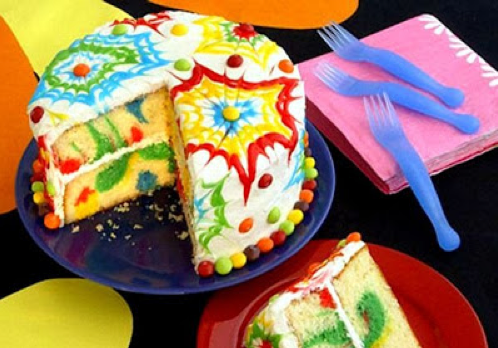
Tie-Dye Sugar Cookie Party Favors Plus Tips on How to Write with Royal Icing
Hi Everyone! I’m Aida, from The Crafting Foodie, and I’m super excited to be a recipe contributor here at Oh My Creative! Today I’m sharing Tie-Dye Sugar Cookie Party Favors plus tips on How to Write with Royal Icing.

With Halloween right around the corner, it marks the official start to the holiday season. Before you can blink, it’ll be Thanksgiving, Christmas, New Year, Valentine’s Day…and the list goes on and on. But whatever else is happening, there are still birthday parties. Birthday parties which are the most important day of the year for the birthday girl or boy. So, in honor of all of the birthday happenings, which don’t stop for the holidays, I’m sharing these Tie-Dye Sugar Cookie Party Favors!
Throwing a birthday party can be stressful, so when a dear friend planned a tie-dye themed party for her daughter, I volunteered to help. Since the children were making tie-dye dresses to take home, a goodie bag seemed unnecessary, but we thought giving out a small favor would serve as a thank you for attending the party. After tossing around some ideas, I came up with these personalized tie-dye sugar cookies.

Because I have a fear of being unprepared for guests, in case I broke one of the cookies or simply forgot to make a cookie for a guest, I made a few extras that simply read, “Thank You!” That way, no matter who showed up everyone would leave with a favor.

I think personalizing the cookies made them that much more special. Piping letters can be a bit nerve-wracking, but after a little practice, it’s pretty simple. Here are my tips on how to write with royal icing:
- Practice with your icing! Use the flat side of a dinner place, and practice writing with the actual icing you will use to write on the cookies.
- I always start with the middle letter of each word. That way, I know how to space the letters. Ensuring that I never run out of room!
- When I make a mistake (which I always do!), simply let the icing crust over (not dry completely, just allow it to harden for 15 minutes or so) then chip it off withe back of a butter knife being careful not to damage the already hard and dry icing underneath.

For more details on which food colors I used and the technique to create the tie-dye look, head over to the cookie-decorating genius Sweet Sugar Belle. She has an amazingly detailed tutorial which you can find here! While these cookies may look intimidating, the very first set of decorated sugar cookies I ever made were tie-dye cookies.


Tie-Dye Sugar Cookies
Ingredients
Sugar Cookies:
- 6 cups all-purpose flour sifted
- 1½ tsp salt
- 2 cups unsalted butter softened
- 2 cups granulated sugar
- 2 eggs large
- 2 tbs vanilla extract good quality extract or vanilla bean paste
Royal Icing:
- 2 lbs confectioner's sugar
- 5 tbs meringue powder
- 1 tbs vanilla extract
- ¾ cup water
Instructions
For the Sugar Cookies:
- Sift the flour and salt.
- In the bowl of a standing mixer fitted with a paddle attachment, cream the butter and sugar until light and fluffy.
- Add the eggs one at a time, mixing until just combined.
- Add the vanilla and mix until just combined.
- With the mixer on low, add the dry ingredients and mix until combined.
- Divide the dough into four equal parts, and flatten each piece into a disk. Wrap in plastic, and refrigerate for about 45 minutes.
- Roll out each piece of dough ¼ inch thick.
- Refrigerate the dough until ready to cut.
- Preheat the oven to 325 degrees F.
- Cut the shapes out of the dough and bake for about 10 to 12 minutes.
- Remove the cookies from the pan, and allow them to cool completely on a drying rack.
For the Royal Icing:
- Wipe down the paddle attachment and the bowl of a standing mixer with distilled vinegar or lemon juice.
- Place the water, vanilla, and meringue powder in the bowl. Whisk with a hand whisk until frothy and all of the meringue powder is dissolved (this will only take a minute or two).
- With the bowl attached to the mixer, add all of the confectioner’s sugar. Mix on medium until it is white, thick and fluffy. It should hold soft peaks. This will take anywhere from 2 to 4 minutes.
Notes
Susan B
Latest posts by Susan B (see all)
- How to Make Grape Jello Shots - March 28, 2026
- The Best Strawberry Cake With Whipped Cream Cheese Frosting - March 13, 2026
- Lemon Drop Jello Shots - February 2, 2026

I have always wanted to make tie-dye cookies, so you have inspired me to finally get on the stick! They are so perfect and colorful! Love them!
These are so colorful and cute! Love them! Thank you for sharing with us this week at Snickerdoodle Sunday! Pinned and tweeted to share!
Susan, I absolutely love these tie-dye cookies! Pinned!
So cute! I am not sure mine would come out as pretty, ha ha! Thanks for sharing on Creative K. Kids Tasty Tuesdays. I hope you will party with us again next week.
How cute! I need to find an excuse to make them.
I am in love with these – super cute and fun! Thanks for sharing on Throwback Thursday!
Mollie
I am definitely in love with these cookies!! Love the tie dye cookies 😀 I wish I could have a whole batch of these right now! How beautiful are these Tie-Dye Sugar Cookie Party Favors Plus Tips on How to Write with Royal Icing – https://www.ohmy-creative.com/kitchen/dessert/tie-dye-sugar-cookie-party-favors/
These look so cute!! I shared them with my coworker who’s wife decorates cookies. She’s gonna love it! Thank you for linking up with #FoodieFriDIY