
DIY Hand Painted Wall Stripes
This is a project I did a few years ago – DIY Hand Painted Wall Stripes. I have always stayed away from wallpaper as beautiful as some of it is. In my last house, I did a lot of rag-rolling with this Iridescent Pearl Glaze from Lowe’s. I would paint my walls a color and go back and do the rag technique in the glaze. It always had a nice subtle texture on the walls that I loved.
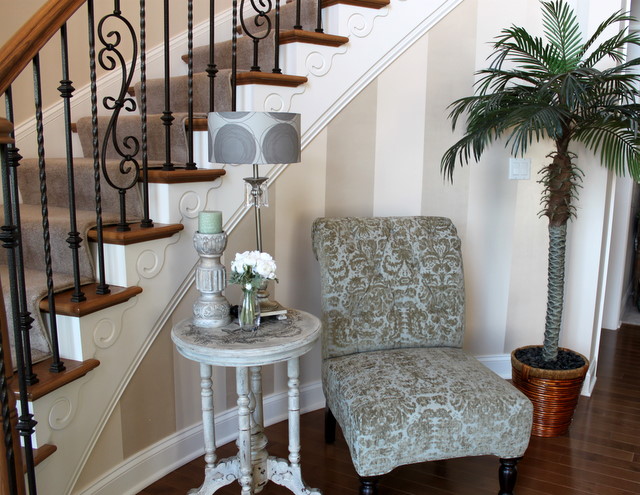
I didn’t really want that same look in this house, so I decided to use the same glaze, in a striped pattern, in this small area on the inside of my staircase. My colors there is silvery and mossy green in this area. I am loving how it all turned out. It really didn’t take that much time – I love a quick project with a significant impact! Look below for the how to…

First, I measured the wall width and decided how wide I wanted the stripes. I then took a small ruler and made tick marks across the wall – about 4 marks for each side of each stripe. I then took a yardstick placing along the tick marks to use as a guide for my painters’ tape.
I did not draw lines down the wall with a pencil. The pencil will show through the glaze and not look very nice. I then taped the yardstick to the wall so that I had two hands to tape the stripes. I moved the yardstick up the stripe as I went along.

You want the tape to go on the outside of the stripe you are going to paint. This takes a little bit of concentration as I taped the wrong side more than once. When you are finished it should appear that you have thinner and wider strips.
After the stripes are painted they will all be the same size. The thinner strips will remain the original wall color and the wider stripes will have the glaze. Don’t forget to tape the tops and bottoms of the stripes.

Here are the products that I used – Valspar Translucent Iridescent Glaze and a small roller. I also had a small paint brush handy for the few corners the roller could not reach.

I covered an old paint tray with foil so there was a clean fresh surface for my paint. I only added a small amount of a glaze at a time. You want the roller to only have a thin amount of glaze on it.

When wet, the glaze does not look very dark.

This photo shows the glaze in the stripes. I waited to the next day to remove the tape in case I need to re-roll anything…and I did in one stripe.

I love how it turned out. It adds a little interest without being overpowering. What I love about the glaze is it is highly reflective. As the light changes during the day so do the stripes. Sometimes it looks light and sometimes darker. It also has a nice elegant feel.

As you can see in this last photo I have a large space going up the staircase above that needs something. It has taken me a while to decide on what that should be. I will share that in my next post!

Susan B
Latest posts by Susan B (see all)
- Pineapple Upside Down Jello Shots - April 13, 2024
- The Best Graduation Table Decorations - April 12, 2024
- Simple Graduation Centerpieces With Free Printable - April 5, 2024
How awesome!!! I want to try this someday! Hope it comes out as awesome as yours! 😉
Stopping by from TT & J and would LOVE for you to come by and link this up (and any other project) at my “Create and Inspire” Party!
http://www.littleinspiration.com/2012/01/create-and-inspire-party-giveaway-link.html
Thanks so much!
P.S. New follower via FB
Angie from A Little Inspiration
So glad you left me a comment on my blos so I could find you!! LOVE LOVE LOVE your site! New follower 😉
Thanks Alli, glad you came to visit!
i love your blog, i have it in my rss reader and always like new things coming up from it.
Beautifully done!
Thank you!
I love how it turned out! So classy!
I love it too! Thanks!
LOVE these. I’ve painted a few striped walls before, so I know this was some work. Beautiful color palette! Would be delighted for you to link up to my brand new party at: http://www.ishouldbemoppingthefloor.com/2012/01/mop-it-up-mondays-party-1.html
{HUGS},
kristi
This looks beautiful and I love that lamp shade! I’ve been struggling with my bathroom and what to do with the walls. This is an excellent idea! New follower! Will you stop by and do the same?
Not Your Ordinary Agent
Not Your Ordinary Recipes
looks great! good idea going bold in this small yet eye catching place!
It is awesome, I’d love to try this in my entryway and I’d definitely go with the glaze, love how it looks!
Visting from Coastal Charm!
Rondell
Thanks Rondell! I love the look of the glaze. It’s perfect for something subtle.
Really beautiful article and a great resource such a helpful define DIY hand-painted wall stripes. thank you