Ghost Jello Shots Recipe
Check this perfect Ghost Jello Shots for Halloween! Easy to make, fun to decorate, and perfect for any spooky celebration. Get tips, ingredients, and more in the post!
Servings: 20 1.5 ounce shots
Equipment
- 20 1.5-Ounce Shot Glasses
- Medium mixing bowl
- Whisk
- Frosting Bag Baking
- Wilton 1A Frosting Tip
- Pourable Measuring Cup (I use a 2-cup size)
- Tweezers (These are a life-saver)
Ingredients
- 4 Packets Unflavored Gelatin 0.25 ounces each
- 1 Can Sweetened Condensed Milk 14 ounces
- 1 Cup Coconut Rum
- ½ Cup Cream of Coconut
- ¼ Cup Cold Coconut Water
- ¼ Cup Boiling Coconut Water
- 1 Tub Cool Whip 8 ounces
- Black Sugar Pearls in Multiple Sizes
Instructions
- Place the cold coconut water in a medium mixing bowl and sprinkle the gelatin over the top. Give a slight stir with the whisk to ensure all the gelatin gets covered by water. Leave to sit for about 2-3 minutes, or until thickened.
- Pour the boiling coconut water over the gelatin and whisk until dissolved.
- Add the sweetened condensed milk, cream of coconut, and coconut rum to the bowl and whisk until combined. If your condensed milk wants to not fully mix, heat the mixture for about 15 seconds in the microwave and then whisk again and it should fix the issue.
- Fill each shot glass, leaving just a bit of head room at the top of each glass. This makes it easier to take back and forth to the fridge.
- Place the shots in the fridge for 2 hours or until fully set.
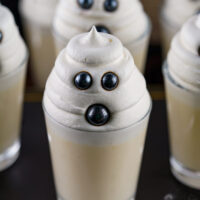
- When ready to serve, using the frosting bag and Wilton 1A frosting tip, top each shot with whipped cream by first filling the shot glass to the brim with the cool whip, pausing, starting a new pile on top, then doing this 2-3 more times until you’ve made a tall stack of cool whip on top of each shot. This isn’t a perfect science and each one will look a little different, which is part of the fun. If it doesn’t work out, simply use the back of a butter knife and scrape the whipped cream off the jello shot and keep trying. Remember to scrape the whipped cream back into the tub as it’s still usable and there’s no need to waste it.
- Once you’re happy with the cool whip, use your tweezers to place two of the medium-ish balls as the eyes and one of the large sugar pearls as the mouth. Be sure to sink the mouth in a litter deeper than the eyes as it makes it look better. You’re finished! Serve and enjoy!
Notes
- Don’t overthink the cool whip stacking. If desired, practice on a plate first. The most important aspect to make the whipped cream successful is to pause and do stacks or it won’t stack up right.
- I found that the off brand of cool whip actually stood up better than the name brand.
- Do not garnish if you’re not getting ready to serve the shots. The whipped cream can go too stiff and the sugar pearls can bleed color.
- If you want to make these ahead, you can store them in the fridge, for up to 3 days, covered, and ungarnished. After garnishing, do not store for longer than an hour. Do not freeze.
- I was unable to find any sugar pearls that were truly black when looking at them up close. They all look super dark gray, chrome-ish. They still do a perfect job, but just as a heads up.
- Using the tweezers is life-changing. This is so you don’t have to stick your fingers in the cool whip when trying to put the sprinkles on. It makes it quicker, cleaner, and more precise. Be sure to quickly wipe the tip of the tweezers in between each use so you don’t leave dots of cool whip all over the next set of sprinkles (if this matters to you).
- If you’re struggling with stacking the cool whip, you can place some cool whip in the shot and use the back of a butter knife to scrape it off so the whipped cream is perfectly flat and then place the sugar pearls on the face of the shot. This still looks cute, but is quicker and easier.